How to Create a New Facebook Group

by Updated April 6, 2009

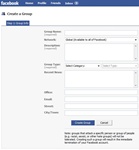
Creating a new group on Facebook is easier than you think. 

  1. To create a new Facebook group simply login to your Facebook account and then go to the following URL: http://www.facebook.com/groups/create.php
  2. Fill out the Group Name and all the groups details, then click the "Create Group" button.
  3. Next you'll be able to add a picture or logo for your Group. This is Optional, but always a good idea to have one to entice people to join your Group.
  4. Now invite members to join your group. You should see a listing of all your Facebook friends. Check the friends that you would like to invite and click the "Invite Friends" button. 
  5. Finish and save.

 Another way to get to the Facebook Create Groups web page is as follows:

  1. Type in "Groups" in the upper right-hand search box on Facebook.
  2. Then use the down arrow key on your keyboard to select Groups from the drop down menu, and then hit Enter.
  3. This will take you to the "Groups" page, where you will then click on the "Create a New Group" button, which is located in the upper right hand side of the page.
  4. Now simply fill out your Group Name and the groups details, then click "Create Group" button.


0
0

Add your comment

by Anonymous - Already have an account? Login now!
Your Name:

Comment:
Enter the text you see in the image below
What do you see?
Can't read the image? View a new one.
Your comment will appear after being approved.

Related Posts


Knowing how to backup your Internet Explorer bookmarked Favorites can come in handy. Especially if you’ve just bought a new computer and want to transfer your favorites list to the new computer, instead of having to re-bookmark every individual website.  more »

A Facebook Page is a public profile that allows you to share your business, products, favorite artist or public figure with Facebook users. Facebook makes it easy to create a "fan" page in just a few minutes Here's how you can create a Facebook fan page:...  more »

So are you sure you're ready to cut ties with your friend on Facebook for good? You may want to take a few days before you decide to remove them from your friends list to think about the decision, since this act could really cause more drama than you...  more »

What to do when you accidentally clicked on one of your own Google Adsense ad unit blocks within your website.  more »

Step by step on how-to change your Twitter background image to make a customized Twitter theme. Login to your Twitter account On the menu tab at the top, click on the "Settings" link. Now click on the "Design" tab. You'll be able to change the theme using...  more »

In Facebook’s quest to further improve their services to thousands of people all around the world, they have formed a partnership with Skype to provide you with a convenient video chat application. In July 2011, the Skype/Facebook chat became...  more »

We often bump into questionnaires, quizzes and surveys followed by a draw. Almost each page owner organizes a Facebook competition, but many of them do not pay attention to the promotion guidelines. It is easy to organize a contests, but it is not easy to...  more »

In this quick tip, you'll learn how to move the cursor on your iPhone or iPad by using the Space Bar (instead of having to drag the cursor itself with your fat fingers).  more »

When first setting up a new Google Plus page for your business / website, you'll probably want to set up a personalized Google+ URL that's easy to remember. However, when claiming your personalized Google+ custom URL, you may be prompted to add Letters or...  more »

This is one of those simple web page design things that can drive a web developer absolutely crazy.  more »

Whether you accidentally added someone as a friend on Facebook or just want to cancel a friend request you made to someone, you can cancel the request. Here's how to cancel a Facebook friend request: Visit the person's profile you want to cancel your...  more »

Adding a CSS border to an ASP.NET Image control was a mystery to me for the longest time. While you could easily use an html image and add the runat="server" to it and then add CSS, I really wanted to use an asp:Image control along with a CSS border....  more »