How to Create and Configure FTP Sites in Windows Server 2003
Configure an FTP Site on a Windows server and start uploading files to your website.
by
Doug
Updated June 17, 2014

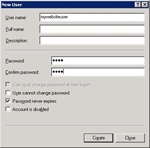
Create a new FTP user account to use for your FTP Site. Make sure to check Password never expires.

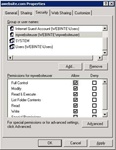
Set the permissions on the directory you want to FTP to. Make sure the Modifify and Write is checked under Allow, for the FTP User account.

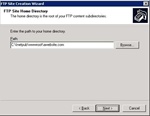
Choose the website folder where you want to FTP files to.
If you're a website owner that is running a dedicated server, you will probably want to know how to setup FTP Sites, in order to transfer files to and from your server. This is especially true if you are not using a web hosting control panel like Helm or cPanel. Setting up an FTP Site and connecting to it using FTP software can be a big pain in the neck if you haven't done it before. In this how-to article I will go through the basics of setting up a FTP user account, and an FTP Site in Windows Server 2003. Keep in mind there are many different FTP configurations that may be better for your particular situation, but this should help you grasp how to setup FTP Sites and begin uploading files to your server using FTP.
Create a FTP User account
- Open Computer Management, to do this go to: Start > Programs > Administrative Tools > Computer Management
- Now within Computer Management go to: System Tools > Local Users and Groups
(Note: If Local Users and Groups is not found in Computer Management)
1. You want to open Console: do this by going to Start > Run > then type mmc and click OK.
2. Then go to: File > Add/Remove Snap-in
3. Click Add > Then Add Local Users and Groups (Local)
- Right-click on the Users folder and select a New User. Now create your User name and Password and then make sure to check Password never expires and click Create. Then click Close. See Figure 1.
- Now go to the folder (directory) on your web server where the website you want to connect to with FTP is located. Typically websites are located in the C:\Inetpub\wwwroot directory.
- Right-click on your website folder that you want to FTP into and click Properties
- Select the Security tab > Add > Advanced… > Find Now
- In the Search results list box, find the User that you just created and select it, and click OK, and click OK again.
- Now in the Properties dialog box, with the Security tab still selected and your User name that you just added selected, make sure in the Permissions box that the Write checkbox under Allow is checked, this allows for Uploading files to the server in your folder. See Figure 2.
- In the same Permissions box, make sure that Modify is also checked. This gives the user the ability to delete files on the server.
- Click OK to save your Properties
Create an FTP Site
- Go to: Computer Management > Services and Applications > Internet Information Services > FTP Sites
- Right-click on the FTP Sites folder and select New > FTP Site
- In the FTP Site Creation Wizard dialog box click Next.
- Give your FTP site a description and click Next.
- Enter the IP address to use for the site and then click Next. (Make sure to use an IP Address that is not being used by another FTP site, or else you may get an error and not be able to Start the FTP site.)
- Select Do not isolate users. You will want to select Isolate users if you require data protection between users (The Isolate users setup is a bit more involved to get FTP to work and will not be discussed here).
- Now click Browse and find the home directory of your website and then click Next. See Figure 3.
- Check both Read and Write. By checking Write you will enable a user to upload files to the site. Click Next and then click Finish to complete.
- Once you’ve successfully created the new FTP Site, Right-click on the your new FTP site and select Properties and go to the Security Accounts tab and uncheck Allow anonymous connections. In the IIS Manager dialog box that pops up, click Yes.
- Then go to the Home Directory tab and check the Write box if it has not been already checked.
- Click OK.
Setup your FTP program with User login details
- Open your FTP program (such as cuteFTP, SmartFTP or WS_FTP) and enter your Username and Password account information which you created above and the IP Address you choose as the Host address.
- Now connect to your site.
You should now be able to upload your website files to your server via FTP.
UPDATE: Just wanted to make the suggestion to anyone who isn't using a control panel on their Windows Server 2003 to definitely look into installing a control panel like HELM on your server. It makes creating websites and ftp sites so much easier. Take it from me, I initially didn't install a control panel on my server, and it became a huge headache to manage everything. I would definitely recommend installing HELM, but just make sure you back up all your sites and databases first (just in case). You can get a free version here: http://www.webhostautomation.com/products/helm4/tryhelm.aspx
UPDATE (1-27-09): HELM is in the last stages of being developed. In other words, going forward it is expected that it will no longer be developed. If possible, I'd seriously recommend upgrading your server to Windows Server 2008. Windows Server 2008 makes adding FTP sites very simple. Look for an upcoming article on this site as to how to setup FTP on Windows Server 2008.