How to Find Missing Folders when Uploading Files in Internet Explorer with Browse Button
Steps you can take to get all the folders showing up that are missing from view when uploading a picture or file using the Browse button in Internet Explorer.
by
Doug
Updated August 12, 2014

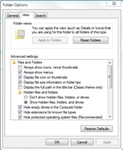
Folder Options -> Show hidden files, folders, and drives

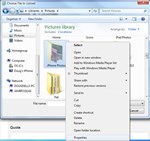
Choose File to Upload -> Right click on the Hidden Folder you want to unhide, and then select Properties.

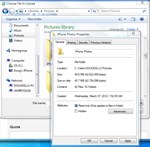
Deselect "Hidden" in the Folder Attributes section.

Confirm Attribute Changes -> Apply changes to this folder, subfolders and files.

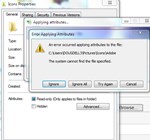
Error Applying Attributes -> Ignore All
For the longest time, I've had a problem of not being able to see all the folders in my Pictures folder when using the Browse button on websites to upload a picture (or file) in Internet Explorer 11 (or in IE10). For whatever reason, some of the folders were missing from view in the Choose File to Upload box when using IE11, however the hidden folders were visible in Firefox and visible when going to my Pictures folder on Windows 7 (64-bit).
Disabling Protected Mode in IE11 would show the folders when using the Browse upload file button from a website. However, I wanted to keep Protected Mode Enabled for security reasons. (However, if you want to disable Protected Mode in IE11 to see if your hidden folders show up, do the following: Open Internet Explorer -> go to Tools -> then select Internet Options -> click on the Security tab -> then uncheck Enable Protected Mode -> and restart Internet Explorer.)
The way I found to make hidden folders show up correctly in the Choose File to Upload dialog box in IE11, was to change the hidden folder attributes. Here's how to unhide folders that don't show up in IE11 when Uploading Files with Browse button:
- In Windows 7 -> go to Control Panel -> then Appearance and Personalization -> then Folder Options
- In Folder Options popup box, select the View tab -> then in the Advanced settings section, under Hidden files and folders, select Show hidden files, folders, and drives. -> then click OK.
- Now open Internet Explorer and go to a website page that has a File Upload browse button (for example go to: http://tinypic.com/)
- Then click on the file upload Browse button, then in the Choose File to Upload popup dialog box, navigate to the directory containing the hidden folder that you'd like to be restored (Note: the folder should be visible, but will be greyed out) and right-click on the greyed out folder, -> then click on Properties.
- In the Properties dialog box, within the General tab, uncheck the Hidden box -> then click Apply.
- In the Confirm Attribute Changes popup box, select Apply changes to this folder only (or if you want subfolders and files to be unhidden then select Apply changes to this folder, subfolders and files) -> then click OK.
- If you get an Error Applying Attributes box popup, just click Ignore All.
- It may take several minutes for the hidden attribute changes to be applied to the folder. Once completed, the folder should now be unhidden and accessible in the Choose File to Upload dialog box in Internet Explorer.
Hopefully, that does the trick.
Once you've gone through the steps above, you may want to restart your computer and make sure the unhidden folder attribute settings have taken effect.
NOTE: If things begin working for you after making the hidden attribute changes to your folders, you may want to go back to Folder Options -> and select Don't show hidden files, folders, or drives.