How to Export and Move Windows Mail messages on Vista to Windows Live Mail on Windows 7

Export messages in Windows Mail.

Windows Live Mail allow you to import messags from the older Windows Mail email client from Windows Vista.
If you've been using Windows Mail on a Windows Vista computer, and upgraded to a Windows 7 computer you may want to copy over your email information from Windows Mail to the newer Windows Live Mail email client on Windows 7. As it stands now Windows Mail is no longer being developed or supported, so you may want to switch to Windows Live Mail...
Keep in mind this is just for transfering email messages and folders, this doesn't transfer email account information or Windows Contacts information. I would recommend first transfering over your email account information, then proceeding with transfering over email messages as shown below.
To start the process of migrating emails over to Windows Live Mail, you will first need to Export messages from Windows Mail. Here's how:
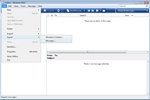
- Start Windows Mail on your Windows Vista computer and on the top menu click File -> Export -> Messages.
- In the Windows Mail Export pop-up, select the second option: "Microsoft Windows Mail" and click the Next button.
- Now use click the Browse button and select an empty folder (or create a new folder) on your hard-drive to export all the email from Windows Mail.
- Once the export folder is specified, click the Next button.
- You are now given a choice between exporting All folders from Windows Mail or only Selected folders (if you choose to Selected folders, use the Ctrl key to select more than one folder). In this case, I recommend choosing the All folders radio button, and then click the Next button to begin the export process for all email and folders in Windows Mail (on Vista).
- An Export Messages box will pop-up and display the progress of the message export. This process will vary depending on the size and number of messages you have stored in Windows Mail.
- Once the Export completes, click Finish.
- Good job! - you just completed the export of your Windows Mail messages to a folder on your computer... However, we still have more to do!
Now the next thing to do is locate the folder where you just Exported the Windows Mail messages to on your hard-drive. You will need to copy and move this folder to temporary folder on your Windows 7 computer. Depending on the size of the exported messages folder you should be able to transfer the folder to a Flash drive, or an external hard-drive, or burn it to a CD/DVD, or through a Network that is setup between your Windows Vista computer and your Windows 7 computer.
So once the exported Windows Mail messages folder that you created above has been transfered over to your Windows 7 computer you will now need to import the messages into the newer Windows 7 email client Windows Live Mail. Here's how:
- On Windows 7, click Start -> then click All Programs -> then click the Windows Live folder -> and open Windows Live Mail
- In Windows Live Mail, you will need to show the Menu, press Alt + M keys on your keyboard. A drop down menu will open up, click on Show menu bar.
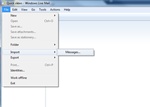
- On the menu bar, go to File -> Import -> Messages.
- A Windows Live Mail Import box will pop-up which allows you to import e-mail from the following programs: Microsoft Outlook Express 6, Windows Live Mail, Windows Mail. Select the last option Windows Mail and click the Next button.
- Now click the Browse button and find the Windows Mail folder on the Windows 7 computer containing the exported messages that you copied over from Windows Mail (that was on Vista computer). Then click Next button once you specified the folder location correctly.
- You'll now be giving the option of importing All folders or Selected folders, just like when you Exported message folders on Windows Vista. In this case, we will choose All folders and click Next to start importing your message folders into Windows Live Mail.
- An Import Messages box will pop-up and display the progress of the message export. The import could take a few minutes depending on how many messages you are importing.
- Once the Import completes, click Finish.
- You will now be able to find all the imported email messages and folders within Storage folders on the left-hand side of Windows Live Mail. From here you will be able to organize the imported messages the way you want in Windows Live Mail.