How to Email Photos in Bulk from an iPhone
Email more than 5 photos at once using the iPhone.
by
Doug
Updated March 2, 2011

Share + Copy + Delete buttons on Camera Roll

Tap the photos you want to email in bulk (you should see a checkmark on the photo), then tap the Copy button.

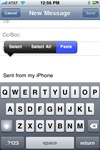
Paste the copied photos into the Message box area of an email message.

Send Email with attached photos to an email recipient.
There's a slight trick to sending more than 5 photos via email using your iPhone. Essentially, you have to select all the photos you want to send and then copy them into your email message box. If you were to use the Share button from the Camera Roll section to send photos, the iPhone currently only allows you to send up to 5 photos at a time. So to email more than 5 photos at a time (in bulk) on your iphone you'll want to use the following copy and paste photo method:
UPDATE: iOS 4.0 no longer allows you to copy more than 5 photos at a time (iPhone iOS 3.0 allowed you to copy as many photos as you wanted and then paste them into a mail message. The work around is to copy 5 photos, then paste them into your email message, then go back to your Camera Roll and copy another set of 5 photos and paste them into your email message, repeat until you have copied the desired number of photos to email. Yes, I realize this is a complete pain in the ass, and I'm not really sure why Apple decided to downgrade the ability to copy more than 5 photos at a time, but I'm guessing it could be due to bandwidth considerations on the networks since the photo sizes are now larger in iOS 4.0.
Here's how to copy and paste photos into an email message:
- On the iPhone, tap the Camera app.
- Go to the Camera Roll section.
- In the bottom left-hand corner, tap the button which will bring up the ability to Select Photos,which you can then either Share, Copy or Delete the photos.
- Now tap each photo you want to email (a checkmark will be placed on the photo). Once you've selected all the photos you want tap the Copy button.
- Press the iPhone Home button, and then bring up the Mail app.
- Tap the button located on the bottom right-hand side to bring up the New Message screen.
- In the New Message section, move the cursor to the message box (just above where it says "Sent from my iPhone").
- Then hold down your finger in the message box area to bring up and select the Paste option. The Photos you selected and copied should now be pasted into the message area.
- Fill out the To: and Subject: lines of the email message, then click the Send button. If you are sending a large amount of photos it may take a few minutes until the email message is finished sending. You'll hear a swishing sound once the email was sent successfully.